Skin is the largest organ of our body, and it needs nourishment like any other organ of our body. We must take care of the skin and provide the necessary attention. The most sensitive skin is our facial skin, which is more prone to acne, sunburn, dry or oily skin problems, and many more. One of the ways to treat our skin is dermaplaning. Let us first know how to dermaplane at home is all about.
Table of Contents
What is dermaplaning?
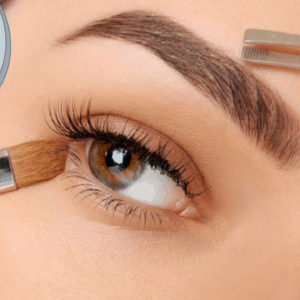
It is a simple procedure, the procedure is about removing the top layer of your skin for smoothing and aiming to remove all the wrinkles and acne. With the result of smooth and glowing skin. It is safe to perform under the guidance of an expert. It doesn’t require any recovery period, and that makes it convenient. This treatment is mainly undergone for your skin to look more youthful, shiny, and softy. Dermaplaning can be done with any skin type.
Dermaplane is nothing but shaving of your face termed in fancy name as “ dermaplaning”. It is effective and helps in exfoliating your skin from all the uninvited and unwanted.
Dermaplaning is like experiencing a spa, and the treatment of skin takes place using a blade that will remove the dead cells leaving behind the beautiful new skin. And you can get these same results for yourself by dermaplaning at home. Before we into how to dermaplane at home, let’s see some of the benefits of dermaplaning.
Benefits of dermaplaning at home
- Shaving your skin removes all dirt, dead cells, and unwanted hair from your face, and this process gives a similar result as dermaplane by experts. When done under experts, dermaplaning provides extensive exfoliation than just shaving at home, but both removes the unwanted from your skin.
- As it removes all the dead cells and hair from your face leaving your skin flawless, it creates a perfect base for the make-up application, the powder, and liquid products now can settle quite perfectly.
- Before the process of dermaplaning, the facial hair would have always trapped the dirt and unwanted elements on your skin, which made a barrier for the skin products to penetrate your skin and be effective. But, with the dermaplaning done, the skin is now able to breathe. And also, the skin products can now work their magic on your skin.
- Removal of the dead layer of your skin helps your skin look brighter rather than being dull before dermaplaning.
Trying dermaplaning
It is beneficial for everyone, but it is more beneficial to mature skin. Aging causes collagen production to slow down, and this leads to slow cell turnover and dry skin. Having a dermaplane will remove the dead cells and make you glow in no time.
So this dermaplaning process is for everyone who wants healthy skin and a glowing one.
Safety
Now let us discuss the major fear that women face. The fear of having much thicker hair, bushier ones than before. It is believed that if one shaves, the hair that grows back will be thicker and even leave the skin dark. But it is just a myth that shaving your hair causes hair to be thicker and skin darker. Dermaplaning does not cause any of the above and also, do not cause any pattern change for hair growth.
There is an increase in the number of people who want to know how to dermaplane at home?
Frequently Asked Questions
So let’s quickly get into the most awaited question and also some more discussion for much clarity.
1. How to do dermaplaning at home?
- Firstly clean your skin and get it dry. The best results come through dry skin.
- Your skin should be pulled tightly, and stroke downwards.
- Start from your ear from the top, slowly moving downwards towards your nose, then to your jawline, your cheeks, and your upper lips.
- Now moving the sides of your face and turning to your forehead, always moving downwards.
- Remember not to stroke in any which ways, make sure you stroke in one direction.
- Avoiding your eyelids and your nose, stroke the neck downward from your jawline.
2. What is the best at-home dermaplaning tool?
The best at-home dermaplaning tool is using a razor. It removes unwanted hair, dead cells. And leaves the skin radiant. A razor is a must-have tool that helps you to groom yourself effectively and provide you an experience with ease and comfort. This is cost-effective and easy to use at home. And it is also painless, which is an added advantage. All you need is a facial razor to get the glow, and radiant skin like a salon provides you, at home itself.
3. How often should you dermaplane at home?
This question is the second highly asked question, “how often do dermaplane at home?”
The answer is as follows.
Dermaplaning removes your dead cells for about 2-3 weeks. So make sure you dermaplane every three weeks to keep the skin clean and away from dirt, dead cells, and hair.
4. Should I dermaplane up or down?
You must dermaplane downwards. Using the tool on the desired area, move the tool stroking downwards. It removes unwanted hair, dead cells, and gives you new skin that is clean and fresh.
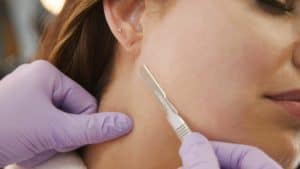
5. How to dermaplane at home with a scalpel?
- Cleanse your face and dry it before you use a scalpel.
- Once your face is dry, take the scalpel and attach the blade to it carefully, do not cut yourself.
- Start with strokes moving downwards, from your ears to cheeks, then to the jawline and upper lips.
- Also, remove dead cells from the forehead and sides of your face.
- No rushing, it may cut you, and always move the scalpel downwards.
- After the process, rehydrate your new skin with the skin products you use.
6. How often can you dermaplane at home?
The experts will guide you with sessions that you must take. One must at least wait for three or four weeks for the new sessions. Dermaplane is a process where you remove the dead cells and unwanted hair. It requires the period for the next new session.
7. How to dermaplane your face at home?
- Nothing is more important than a clean blade for dermaplaning.
- Use new blades and always keep them clean before use, also clean your face, or else you will be driving the dirt and germs to your pores.
- Your skin must be held tight, and run the razor to downward motion, with gentle strokes. Go slow and work patiently.
- After the process, you may apply your skin product for hydration of your skin, and also now you can see much effect from the skin products that you use.
It’s an easy process, and next time when some seek an answer from you for the question: how to dermaplane at home?” you surely will be able to answer.
8. Should you dermaplane with oil?
One may dermaplane with oil if your skin is dry and sensitive, although it is optional. One may apply if they want or even start without applying oil. You apply oil after it’s done, and that’s too optional, you may use any skincare product after the process on your new skin.
9. How to do at home dermaplaning?
- Purchasing the tool is the first step. You cannot be using any random tool on your face.
- Make sure you are clean by using a cleanser on your face and removing all the dirt and germs. You may apply any gel, oil, or lotion, and it is optional.
- Now take the dermaplaning tool wet it, and stroke with it on your face in downwards motion only.
- The correct angle of dermaplaning is crucial for the best results. After each stroke, wipe or wash off your tool with water and then strike again. With the dead cells coming out while stroking, one must clean them before the next stroke.
- Wash or rinse your face with water after the process and wipe with a towel
- Apply any of your skin products for rehydration of the new skin. The new skin grants access for the skin product to enter deep and show its magic with the nutrients present in the product to make your skin glow and keeping it healthy.
10. How do you dermaplane without breaking out?
Using the right tool is important for how to dermaplane at home. The major cause for breakouts are the patterns you shave, make sure you are always downwards, and the same pattern has to be adopted. Remember to be gentle on your face it is one of the causes for breaks out. Follow your skin and understand what it wants. For some, the dermaplane on dry skin doesn’t work which may also be the reason for breakouts, for such instances, you may wet your skin or follow dermaplane according to your skin requirements.
11. What should you not do before dermaplaning?
- One must avoid sun exposure, and if your skin is sensitive and easily gets sunburns, then please do not expose your skin to the sun before your dermaplaning. Even the skin burns with the slightest one too, the esthetician won’t be able to perform dermaplaning.
- Do not exfoliate your skin before visiting for dermaplane. Using all scrubs and creams before dermaplane isn’t a good idea as the chemicals you use exfoliates the skin. And then a visit for dermaplane again exfoliates your skin, and these over-exfoliators can irritate your skin, which may be harmful.
- Do your waxing two or three weeks before dermaplane. Both the process helps with the removal of the hair, and the dead skin cells, so make sure to wax if you want to weeks before dermaplaning. It will help your skin to be stable and not get irritated because of continuous exfoliation.
- Dermaplane is an excellent way in reducing face acnes and makes you look youthful and bright however do not opt for the session if you have active acne or even a smallest of a pimple. Waiting for them to go completely is important, as it helps in providing you the best results.
12. How to dermaplane at home steps?
- Cleanse skin and make sure it’s dried completely.
- Hold the skin tight, and with a blade, on the other hand, move downwards at a 45-degree angle. Repeat wherever you wish.
- Wash your face and apply your skincare
- Repeat when needed or even for a special occasion.
13. How to dermaplane at-home tools, is it better to dermaplane wet or dry?
It is always recommended, to dermaplane on dry skin. The drier the skin, the best result you achieve.
There is a tools option for how to dermaplane at home.
- To use easily, you can opt for a complexion facial dermaplaner, which gives you beautiful and radiant skin. Remember to dermaplane on dry skin for the best results.
- The painless facial hair remover, this tool is great if you have thick hair around your face. This tool makes it easy for you to remove without any pain and also achieve new skin.
- The setter razors are affordable for the dermaplaner. With just a tiny amount of money, you will get the razors, which will leave your skin flawless with no unwanted invitees.
These are easy-to-use tool for how to dermaplane at home.
14. Which way do you dermaplane?
First most, the important step of cleansing your face, followed by drying it (if dry dermaplane isn’t suitable for you then you may wet your skin or follow the skin call for the same). Before using the tool, make sure it is clean so that it doesn’t cause harm to your skin. Now hold your skin tight and move the tool downwards gently in the same pattern. Do not move upwards as it may cut your skin easily.
Wash your face after dermaplaning and pat dry. Apply your favorite skincare product to your new skin. Allow your skin to use the nutrients of the product to have glowing skin. You may dermaplane with an interval of two or three weeks before the next session.
You may either go for the guidance of the experts, or you may how to dermaplane at home itself.
It is an easy process how to dermaplane at home, and one doesn’t need to undergo difficult treatment to get rid of those peach fuzz and dead cells that haunt your skin. Exfoliating skin helps in achieving beautiful and radiant skin, which is a necessary part of taking care of your skin. As the skin is sensitive and just like others, you need to pay attention to its indications. Dermaplane can help in taking care of your skin with ease and comfort.